Info
PPD - Pay Per Download via Paypal & Stripe
Author : CodeDaddy
Create Date : December 17, 2020
Support : yupokteam@gmail.com
Overview
Looking for Your Pay Per Download Marketplace then You are viewing Right Item at Right Place.
Only Simple 4 Line Setup & Script is yours, If 5th Line then We'll setup all thing on your Behalf
Just Create & Upload Your Projects and Earn Passive Income via Stripe.
Security : It is protected against SQL injection, XSS and other attack and your website will be safe.
Requirements
Before starting to install, make sure you fulfill the following requirements:
- You can use this script on any live LINUX server.
- Required PHP version in server >= 5.4.
- Required PHP Mail Function enabled in server.
- Paypal Business Account
- Stripe Merchant Account
- https website
Admin Features
- Dashboard (New - Version 1.1)
- Today Analysis (For Item & Wallet)(Sale, Earning & Top Item)
- This Month Analysis (For Item & Wallet)(Sale, Earning & Top Item)
- Total Analysis (For Item & Wallet)(Total Sale, Total Earning & Top Item)
- Item Analysis (Total Items, Active Items & Deactive Items)
- User Analysis (Total Users, Active Users & Blocked Users)
- Settings
- Main Setting
- Admin Name (Name attach to Email)
- Quick Link Name which shows in Footer
- About Us Name which shows in Footer
- About Us Info which shows in Footer
- Copyright Name which shows in Footer
- Admin Email (Where Admin Receives Every Email)
- Yes / No Option (Receive Email to Admin whenever New Sale)
- Yes / No Option (Send Email to Purchased Item by User whenever Admin Update Main File)
- Default Load - Means How many Items, Loved Items, Transaction Details , etc you want to show by default
- On Load - Means How many Items, Loved Items, Transaction Details , etc you want to show by After Pressing Load More Button
- No. of Chances (How many Chance Admin give to User to Verify their Email)
- Unblock Message (Means When Admin Unblock any User then This is the Email Body)
- Social Setting(Which Shows in Footer)
- Facebook Profile Link
- Twitter Profile Link
- Linkedin Profile Link
- Behance Profile Link
- Dribbble Profile Link
- VK Profile Link
- Google Analytics Setting
- Paste Google Analytics Javascript Code
- Turn On/Off for All Users Pages
- Turn On/Off for All Admin Pages
- Main Setting
- Dynamic Wallet Plan (New - Version 1.1)
- User can Add Credit to their Wallet
- Create Dynamic Wallet Plan
- Paid Amount, Bonus Amount
- Search, Edit , Activate / Deactivate Plan anytime.
- No Transaction Fees (If User adds money into their wallet or Item Purchase via Wallet)
- User can Add Credit to their Wallet
- Payment Setup
- Paypal Setup
- Paypal Business Email
- Paypal Payment Turn On/Off
- Paypal IPN
- Paypal Success URL
- Stripe Setup
- Stripe Publishable Key
- Stripe Secret Key
- Stripe Payment Turn On/Off
- Transaction Fees (New - Version 1.1)
- Add Transaction Fee from $0 to Unlimited
- Note : Pay Via Wallet includes No Transaction Fees
- Paypal Setup
- Payments History (New - Version 1.1)
- Items - Payment History like Date, User ID, Email, Name, Item Name, Payment Method, Amount, Transaction ID & Search.
- Wallet - Payment History like Date, User ID, Email, Name, Wallet Plan Name, Paid Amount, Bonus Amount, Credited Amount, Payment Method, Transaction ID & Search.
- Users
- Search User
- View User
- Block User
- View Total Purchase of Every User
- View Wallet Balance of Every User
- Blocked Users
- Search
- View
- UnBlock User & Send Automatically Email
- Category
- Add
- Edit
- View
- Search
- Activate
- Deactivate (Note : If Category Deactivated then All the Items belongs to that Category will also be Deactivated & Hide from Users. )
- Upload Item
- Mandatory Fields Step - 1 (Item Name, Regular & Extended License Price, Main Category, Sub Category, Item Description & Item Tags )
- Optional Fields Step - 1 (Child Category, Item Demo Link & Youtube Video Demo Link)
- Mandatory Fields Step - 2 (Thumbnail Image, Preview Image & Main ZIP File)
- Optional Fields Step - 2 (Screenshot ZIP File)
- Bonus : You can save Your Item also in Draft
- Edit Item
- Mandatory Fields Step - 1 (Item Name, Regular & Extended License Price, Main Category, Sub Category, Item Description & Item Tags )
- Optional Fields Step - 1 (Child Category, Item Demo Link & Youtube Video Demo Link)
- Mandatory Fields Step - 2 (Nothing)
- Optional Fields Step - 2 (Thumbnail Image, Preview Image, Main ZIP File & Screenshot ZIP File)
- Bonus : You can save Your Item also in Draft
- Items
- Add Item
- Search Item
- View Item Category Name
- View Item Name, Tags, Sales, Loved By, Created & Updated Date & Status
- Deactivate Item (Item was saved into Draft & Hide from Users)
- Edit Item
- Download (Thumbnail & Preview Image, Main File & Screenshot File)
- Draft Items
- It will show Only Deactivated Items
- Add Item
- Search Draft Item
- View Item Category & Category Name
- View Item Name, Tags, Sales, Loved By, Created & Updated Date & Status
- Edit Item
- Download (Thumbnail & Preview Image, Main File & Screenshot File)
- Top Selling Items
- It will show Only Items which have at least 1 Sale
- Add Item
- Search Item
- View Item Category & Category Name
- View Item Name, Tags, Sales, Loved By, Created & Updated Date & Status
- Edit Item
- Top Loved Items
- It will show Only Items which have at least 1 Love
- Add Item
- Search Item
- View Item Category & Category Name
- View Item Name, Tags, Sales, Loved By, Created & Updated Date & Status
- Edit Item
- Pages
- Create Unlimited Pages with Lots of Styles (Like Privacy Policy, About Us, etc.)
- Mandatory Fields(Page Name, Page Slug & Page Content)
- Page Slug : It must be Unique & Small Letters with no special Characters
- Manage Pages
- Search
- Edit Page
- View Page
- Activate / Deactivate Page anytime.
- Deactivated Page will automatically hide from Users.
- If All Page was deactivated then Pages Option will automatically Hide from User Panel.
- Others
- Change Email
- Change Password
- Forgot Password (Recover via OTP)
- Login
- Logout
User Features
- 3 New Uploaded Item with Browse All Button
- 3 Top Loved Item
- 3 Top Downloaded Item
- 3 Top Viewed Items
- Login
- Ajax Login
- Forgot Password(Recover via OTP with jQuery & Ajax, No Page Reload)
- Ajax Change Email after Login
- Ajax Change Password after Login
- Recover Password via OTP
- SignUp
- Ajax SignUp
- OTP Verification
- No. of Chances to verify OTP which Set via Admin in Admin Panel.
- Resend OTP
- Cannot Do Anything Until User Verify OTP
- Item Search
- User Friendly URL
- Show only Active Item in Search with Load More Button
- Item will show via Title and Item Tags matching.
- Wallet (New - Version 1.1)
- Add Money into Wallet(Only Active Wallet Plan which is created by Admin)
- Stripe / Paypal which is Active
- No Transaction Fee for Adding Money to Wallet
- Purchase via Wallet(No Transaction Fee)
- Items & Checkout
- User Friendly URL (Ajax Used - No Page Reload)
- Purchase via Wallet(New)
- Fast & Secured Checkout using jQuery & Ajax Used - No Page Reload
- Show only Active Item
- View Screenshot (If available)
- View Preview (If available)
- View Video (If available)
- View Tags with Link
- Add to Loved Items
- View Created & Last Updated Date
- View Filesize
- View Related Product at Bottom If available
- View Top Download Product at Sidebar If available
- Social Share with Facebook, Twitter or Whatsapp
- Loved Items
- User Friendly URL
- Can Add Items into Loved Tabs
- Show only Loved Items
- Load More Loved Items with No Page Reload
- Purchases
- User Friendly URL
- Search Purchased Items
- Show only Purchased Items
- View Item Thumbnail, Item Name, Transaction Id, Payment Method, Date & Amount of Purchased Items
- Downloads
- User Friendly URL
- Search Purchased Items
- Show only Purchased Items
- If Item is Active Download File will be available.
- Show Item Thumbnail, Item Name, Item Total Downloads, User Loved
- Profile
- Nice view with Ajax(No Page Reload)
- Change Name
- Change Email
- Change Password
- Pages
- User Friendly URL
- Show only Active Pages
- Awesome Page view with Link Support & Line Colors which is saved by Admin.
- Cannot view Page if Page was deactivated.
Create Database, Username, Password & Import SQL file.
- Step 1: Login to your website CPanel with your Username & Password.

- Step 2: On Homepage, Scroll Down to Databases & Click on MYSQL Databases option.

- Step 3: Create New Database, Just write billing_system & press Create Database Button.

- Step 4: A message appears, Added the database "yupok_billing_system" It means Your Database Name : yupok_billing_system , Note : yupok_ prefix is demo, your website automatic added Prefix to your database name.So copy that name that is your Original Database Name.
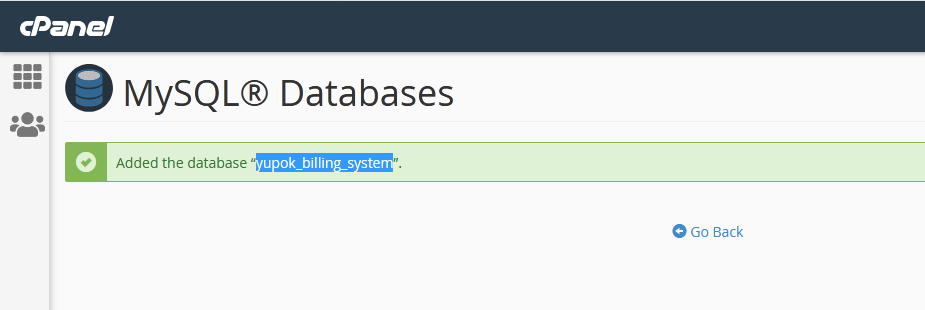
- Step 5: Press Go Back and return to Database Page again.
- Step 6: Scroll Down the Page, MYSQL Users Add New User, Just fill the details like you want to use Username & Password & keep details in the safe place & Press Create User button.
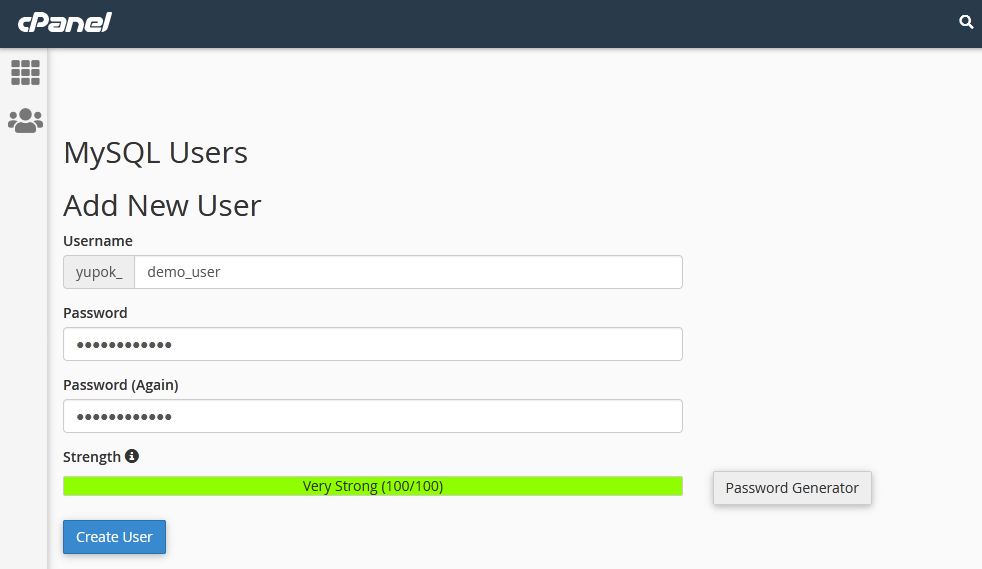
- Step 7: A message appears, You have successfully created a MySQL user named "yupok_demo_user". It means Your Database USERName : yupok_demo_user , Note : yupok_ prefix is demo, your website automatic added Prefix to your Username.So copy that name that is your Original Database Username.
- Step 8: Press Go Back and return to Database Page again.
- Step 9: Scroll Down the Page again to Add User to Database . Select your Last Created Username & Last Created Database for this billing system & Press Add Button.
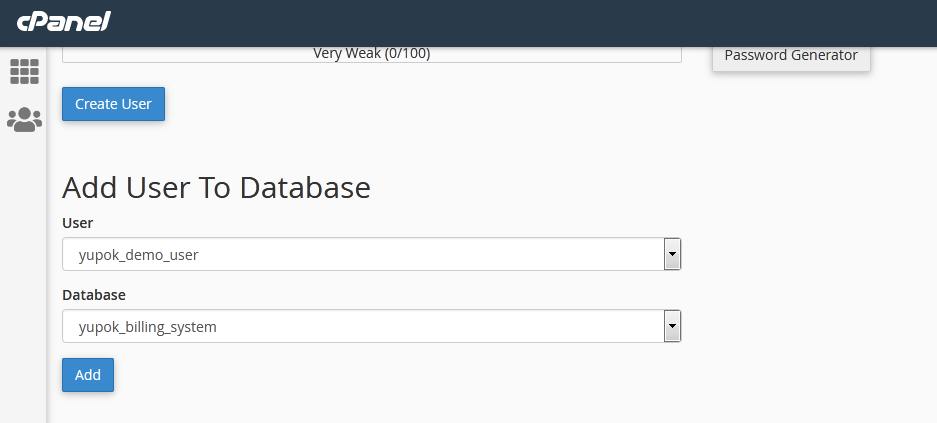
- Step 10: You will redirect to Another Page. Click on ALL PRIVILEGES option, Scroll down & Press Make Changes Button.
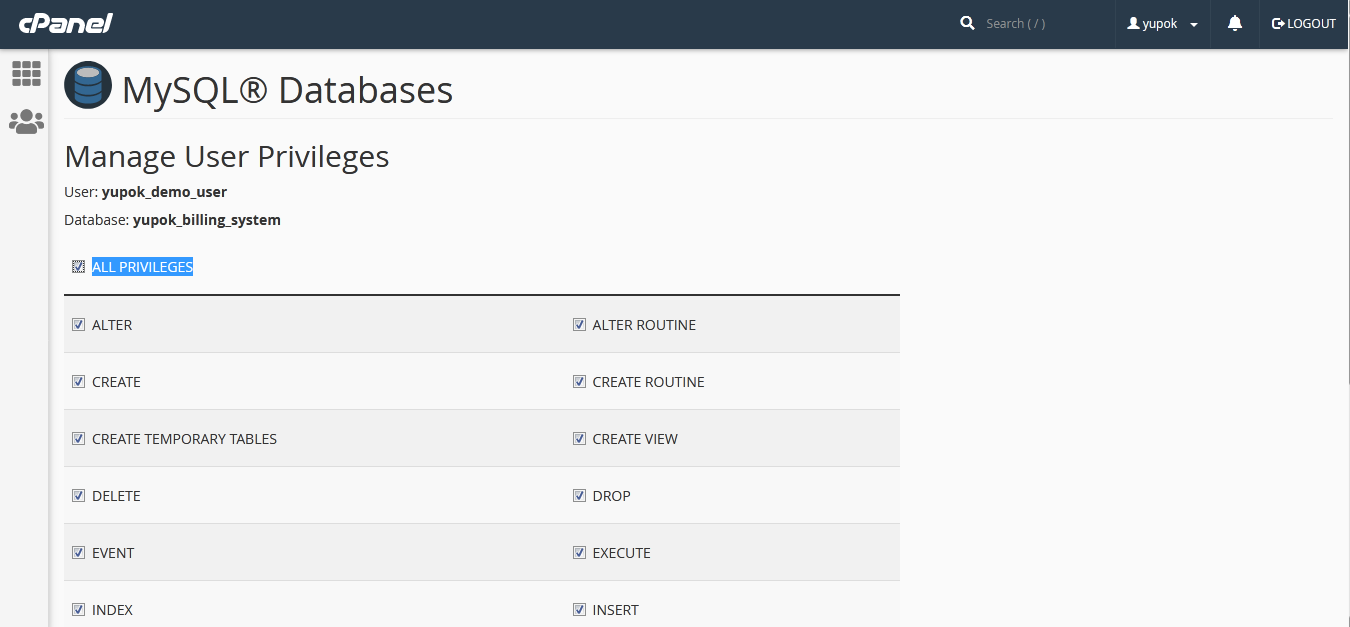
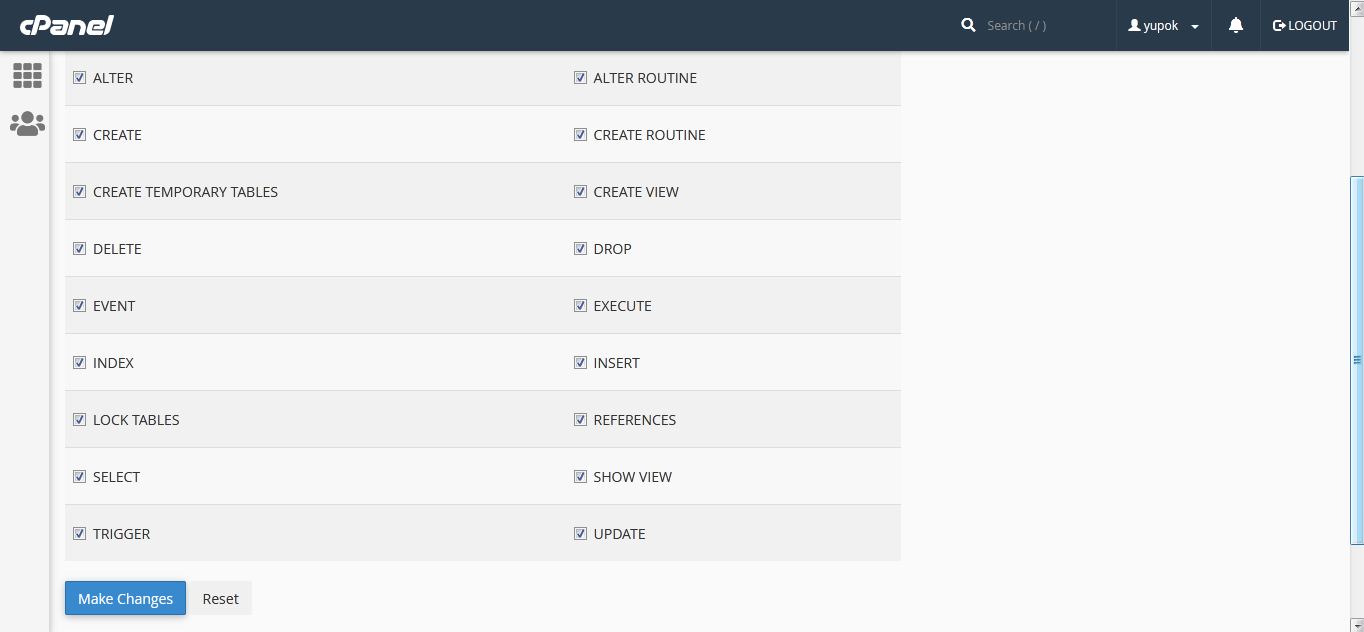
- Step 11: A Success message appears on top right corner. After that scroll down to the page and press Go Back
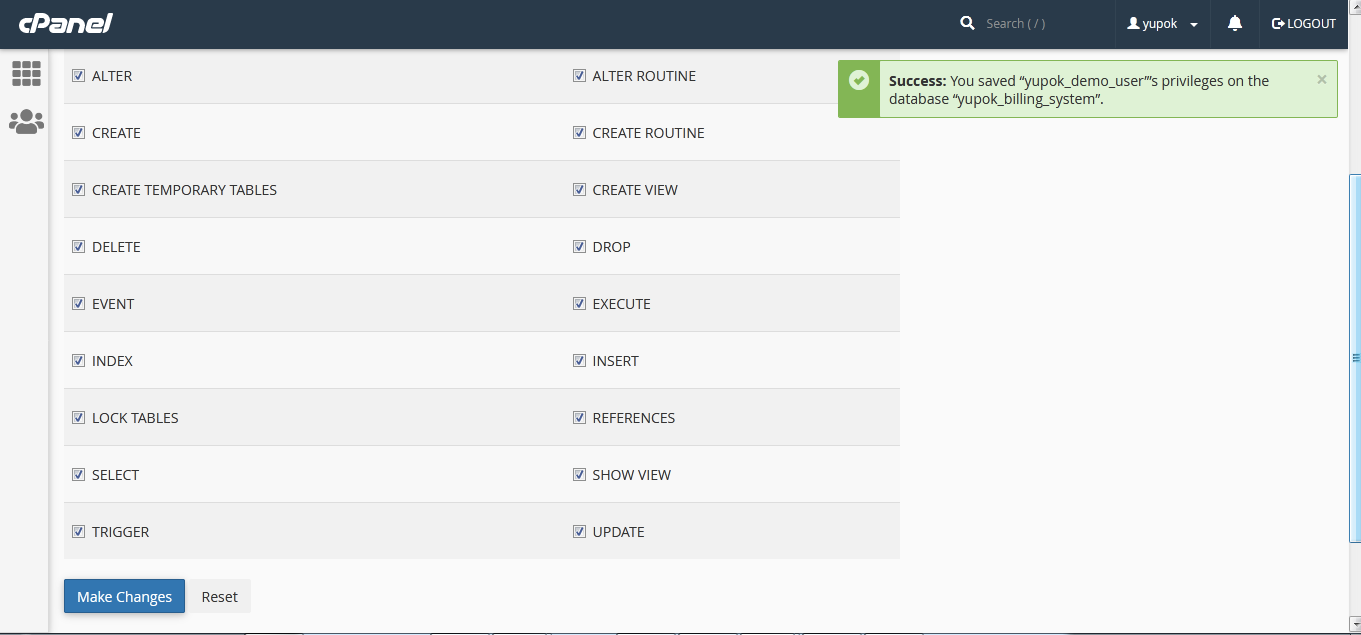
- Step 12: Example
YOUR_HOST_NAME : localhost Mostly its localhost but if not then contact your website service provide.
YOUR_DATABASE_NAME : yupok_billing_system This is demo which we explained above. Your real database name is different.
YOUR_DATABASE_USERNAME : yupok_demo_user This is demo which we explained above. Your real database username is different.
YOUR_DATABASE_Password : password That is explained in Step 6.
- Step 13: Import sql file to Database. Go to CPanel homepage scroll down to Database , Click on phpMyAdmin, your database will be open.
- Step 14: On the left sidebar your Newly Database Option will be shown Just click on that.
- Step 15: After click see on right side there is Import Option click on that and browse & select sql file from your downloaded database folder and press Go Button on the bottom.
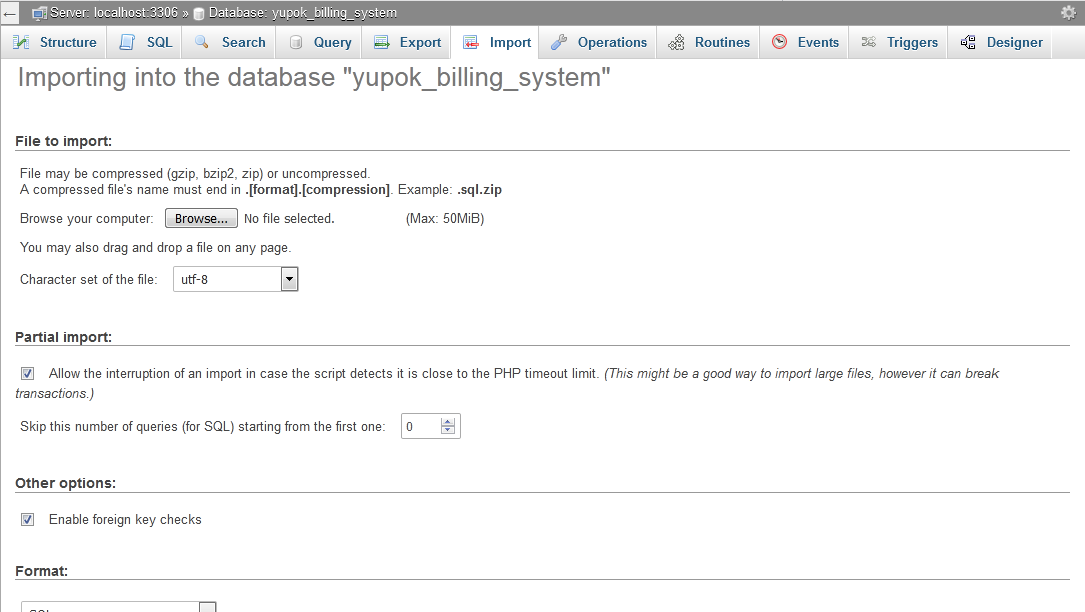
- Step 16: Your database will be imported and your website is ready to Use.
Configuration
Do Carefully Otherwise Script will not work
- Unzip the Downloaded File, open upload Folder and go to _adminarea_ folder

- Now Go to db folder

- Open config.php file in any Text Editor like Notepad++, Dreamweaver , etc.

- Save Details according to your database. Read below section, How to create Database, Username, Password & Import SQL file.

First Time Admin Login
- When you have configured correctly Database & Import SQL file then upload time.
- Go to downloaded file -> Go to upload folder -> Copy all files & folder (Note : In _adminarea_ folder, go to db folder and open config.php file and replace details with your server detail which we explained above.)
- Create Folder on your server where you want to Upload this script. Upload all copied files.
- Let we help you in Detail with example.
- Assume you make a folder on your server digital and upload all copied files with correct database configuration.
- URL for Admin : www.yourwebsite.com/digital/_adminarea_/
- Assume you don't make any folder and upload it into root directory i.e. www or public html folder on your server and upload all copied files with correct database configuration.
- URL for Admin : www.yourwebsite.com/_adminarea_/
- Default Email : admin@admin.com & Password : 123456
- Click on User Icon on Top Right Corner => Click on Email => Update Your Login Email.
- Click on User Icon on Top Right Corner => Click on Password => Old Password = 123456 => Set New Password & Keep in Safe Place
Paypal Setup
- Step 1 : First Login to your admin panel of this script.
- Step 2 : Open a New Tab and then login to your Paypal Business Account
- Step 3 : Come on Admin Panel Tab, Click on Paypal Setup option on left sidebar
- Step 4 : Copy the generated URL on that page.
- Step 5 : After Copied URL , Click on Link written above generated URL i.e. Click Me for Paypal IPN URL

- Step 6 : A New Tab opens with Paypal IPN URL

- Step 7 : Click on Choose IPN Settings. A new page will be Open.
- Step 8 : First copy your IPN Url in Notification URL box which you copied in Step 4, then choose option Receive IPN Messages(Enabled) and Click Save.

- Step 9 : Copy the generated Auto Return URL on that page.
- Step 10 : After Copied URL , Click on Link written above generated URL i.e. Click Me for Paypal Auto Return URL

- Step 11 : A New Tab opens with Paypal Auto Return URL

- Step 12 : Auto Return should be on with Copied URL and after that Payment Data Transfer should be on
- Step 14 : This is the last Step, Come on to the admin panel go to Paypal Setup option again and Turn On Paypal Payment & Save your Paypal Business Email Address.

Stripe Setup
